Refocus – PSIParser

So, I’ve taken a huge step back in terms of blogging.  I just haven’t felt like there’s been much to blog about.  I’m here to refocus because I’ve made what I consider “huge wins” with working on XB-PointStream.

I did feel like I didn’t have much to blog about.  I was having huge problems in the past.  I even approached certain knowledgeable people in the field and they couldn’t help.  It was all a very frustrating experience.  I found the problem and it was one of those really minor ones that can ruin your whole focus.  It was almost as bad as a missing semi-colon… but harder to debug because there were no actual errors being given by the program.  And now I’m sharing so there can be a bit of guidance for those that need it.

First, let me tell you about how I’ve gotten to this point.  I was able to make an example that provided me with the right data by taking binary information and translating it to something comprehensible.  Now, the next step was to use that knowledge and transcribe it into our XB-PointStream system.  This is the point where in I start to have problems.  While plugging in my knowledge and adapting it into parser form, I forget an integral part of reading binary.  Which was:

AJAX.overrideMimeType('text/plain; charset=x-user-defined');

The above code is very important… if missing, the binary values you’re receiving from your XmlHttpRequest will not be correct.  This little bug was my bane for a long while.  I could not understand how I could get it to work with one example and not my new parser.  This lead to my taking apart my parser in numerous points and not being able to see my problem.

After resolving that huge issue, fixing up this parser has been much easier.  I’ve got this example of mickey loading without any normal information.  If you click the picture above, you will see that I have also got it working with our acorn example.  This shows the dynamic properties instilled within the parser.  I’ll have more of our examples up soon.  Soon, lighting will also work as soon as we can adapt our framework to take unsynchronized vertex attributes.  That’s what is coming for our 0.6 Release.

XB PointStream at FSOSS 2010

The Free Software and Open Source Symposium has come and gone (nine days ago) and I’ve still yet to blog about my presentation.  In fact, I just plain haven’t blogged in a while.  I’ve fallen out of habit.  It could be that I’m too busy or that I still don’t like writing about things I haven’t completed.  Either reason is no good and inexcusable.  I’m here to rectify that and talk about my presentation at FSOSS 2010.  I may, also, provide an update (later on in the day) on what’s going on with XBPS.

It was, overall, a good experience.  I’m a little less scared when it comes to public speaking now.  My fellow CDOT workers and I had practice runs.  We also gave constructive feedback on how we can improve our presentations (special thanks to Mike Hoye for sitting through our presentations when he didn’t have to).

The actual presentation ran a lot shorter than I had wanted it to go.  It ended up being only fifteen minutes.  I didn’t want to really get into too much technical detail and was going more for a broad explanation.  The interest came through after when the question section matched the speaking time.  However, looking back, some of those questions should have really been included in the presentation.  By trying to slim down the presentation so much, I made it maybe a little too precise.  In any case, I think it went well and did generate some interest in the project.

My slides are on the web for you to view (they’re made with HTML5): click here.
If you wish to see the slides and hear my talk then follow this link:  click here.  (Also, maybe I should’ve repeated the questions asked.  I’ll go through the question and answer section and put down the questions asked in order on this blog for you to follow along).

Git Gui

By popular demand (and by demand I mean Donna), here’s a blog about what I know about my basic knowledge of Git Gui (which stands for graphical user interface).  I’m going to skip the installation part, since Anna’s done a pretty comprehensive guide here (for Windows) and here (for Mac).  There’s also the Github resources for Windows, for Linux and for Mac.

After installation, you can immediately access the gui.  For Linux, the easiest way I’ve found is to open up a terminal and type git gui and hit enter.  That’ll bring it up for you.  For Windows, you can do the same thing with the mysysgit terminal or use the icon provided in the installed folder.  I’ve had someone test this with a Mac (I could be wrong since I didn’t do any of the testing myself) and you can only open it up through the icon provided – typing git gui on the console of a Mac just comes up with errors.  I’ve also not included how to link your git client to the Github repo (using SSH keys).  If you need help with that, just follow these links for Windows, Linux, and Mac.

So after starting up the application, the first screen you get will be the following:

Since this is most likely you’re first start up, I’ve highlighted the clone existing repository link which you would have to click.  If you’ve already cloned a repo, just open it using the link below the one I highlighted that says “Open Existing Repository” and skip to the next image past the one below.  Cloning, however, gives you the next following screen:

The screen above is pretty self-explanatory.  The source is the remote repository and the target is the local one you wish to put it in.  After clicking the clone button, you’ll get the main screen as shown below.

I’ve loaded up the main screen with a few changes to help explain the ideas better.

1)  It’s what I believe is the most important part.  The label tells you what current branch you’re working on.  This in itself is way better than the command line as you’d have to type git branch over and over again just to make sure you’re on the right branch.  It’s a very useful item.
2)  This section includes all the files that have changes and needs to be looked over and staged.  This is where you would find items with merge errors as well.
3)  This is the staging area.  All the files here are ready to be committed.
4)  The diff box is what I like to call this area.  It tells you the changes made in the file.  + for additions and – for subtractions at the beginning of each line.
5)  I’m labeling this area as the git (tool)kit.  These buttons are going to be the most used buttons while you use git gui.  This is especially true if you submit a lot of patches for your remote repo.  “Rescan” looks through the local repo for any changes.  “Stage Changed” takes everything that can be staged in section 2 and puts it into the staging section 3.  “Sign Off” puts your name in the commit message (you’d have to have this configured already with SSH keys and such).  “Commit” takes all the files in the staging section and commits it to your local repo.  The “Push” button, of course,  pushes to your already linked remote repo.

How do you link your repo to your remote one?  Good question.  It’s normally generally already linked when you create it.  Which brings me to the next topic at hand, how do we create a repo with git gui?  The picture below shows the menu to create and deal with branches.

When you click the Branch menu, the drop down brings up the list above.  Checkout allows you to switch to other branches linked to your repo (more on this later).  Rename, reset and delete are pretty self explanatory.  Note:  All those commands, only apply to your local repo (until you push to your remote one).  Creating a new branch on your local machine is as easy as clicking Branch then create (or Ctrl-N for those ahead of everyone else).  Creating a new branch brings up this screen:

When creating a new branch, I generally like to leave everything defaulted.  However, there are generally a few options to fiddle with still.

1)  You have to name this branch.  Totally up to you on what it could be… there are probably limits but I haven’t found the need to be that creative with my naming convention yet.
2)  This shows all the branches on your local machine.
3)  This shows all the branches you are keeping track of.  This is especially useful for those who pull from other people’s remote repositories.
4)  The list of the radio button list option above.  This is also what you would select your new branch be based on.  (Note:  General good practice is to update/merge your master and create new branches off your master branch).

If you’re switching branches, you click Checkout on the branch menu and you’d get the screen below.
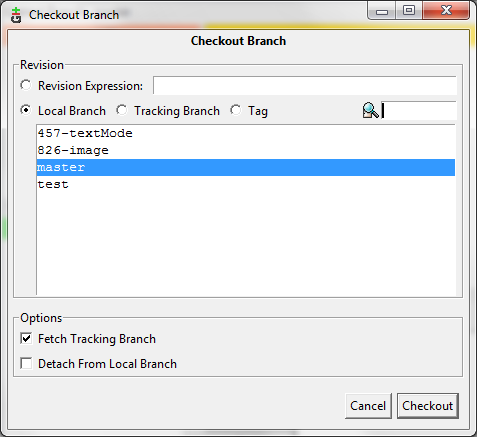
Look familiar?  Probably because it’s very similar to the create screen (minus the naming of the branch).  Checkout works an awful lot like creating a branch.  You pick which branch you would like to switch to and you have the option of using a local branch or a branch you are tracking (either your remote repo or other people’s remote repo).  This brings up the question of “How do you track other people’s repo?”  Look at the next screenshot to find out!

Generally, the top 3 sub-menus would only be initially filled with “origin”.  Which is to say, your original remote repo.  To track more repos, you would have to go to the Add section of the Remote menu.  I didn’t provide a screenshot of that menu as it is pretty self explanatory.  You provide a name and the git link for the repo you wish to track and voila that repo shows up in the top 3 sub-menus.  The main function I tend to use is the “Fetch from specific repo”.  This allows me to track the branches of that repo and helps populate the tracking branch section of the create and checkout menus shown above.  After fetching a repo, my normal course of action is merging a branch from that repo to the current working branch of my local repo.  The merging menu is shown below.

Abort merge removes all the changes you made with the current merging that’s being done.  It’s only normally used if you’re in the middle of a merge and made a mistake.  Clicking local merge brings up this next screenshot.
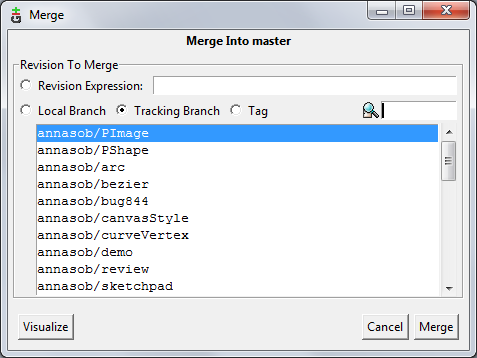
Again with the familiarity.  It looks similar to the checkout and create menus!  Now, this list (under the tracking branch) should be filled.  If it’s not, you probably haven’t “fetch from” someone else’s remote repo.  If it’s not and you have done that, then your current branch is up to date with everything they have in their branch.  You can also merge from other branches in your local repo if you click the local branch radio button option.  If you merge quite often, which I do suggest, then you shouldn’t really have any merge problems.  If you end up with merge errors (git couldn’t complete the merge for you), it’ll show up in the diff box.  You will have to go into the files and fix it manually though.  Git makes it easy enough to find those problems by providing you with <<<  and >>> notation.

One last piece of information for git gui comes from the Commit drop-down menu shown below.
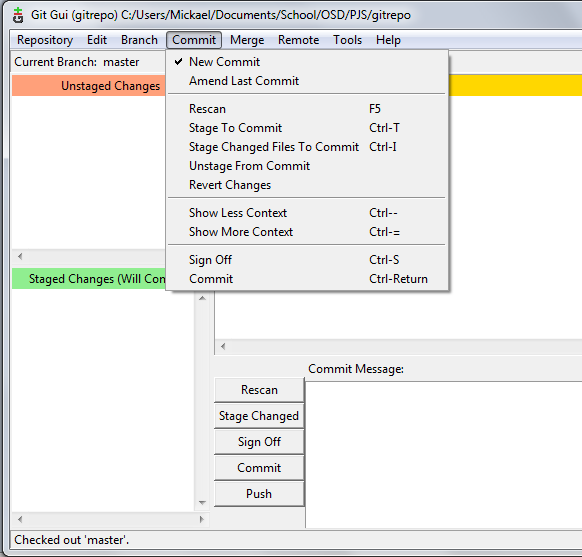
Some of these options are presented in the buttons below, like Rescan, Sign Off, Commit and Stage Changed.  “Stage to Commit” stages only the specific file selected in the Unstaged section.  “Unstage from Commit” does the opposite and removes a single file from the staged section and puts it in the unstaged section.  “Revert changes” turns back the specified files and returns it to it’s original standing (before any recent uncommitted changes were made to it).

Well, that’s all the basics I think should be out on the web.  If you have specific questions, feel free to leave a comment and I’ll try to answer it as best I can.  Thanks for reading and I hope it helps!

New School Year, still working on the same projects

Though do not let that sound resentful; it’s not at all.  I’m still glad to be working at Seneca’s Centre for Development of Open Technology.  It’s great to be able to do work on open source tech (and get paid for it).  Processing.js is coming to a close for several of us.  At least, with the release of 1.0, maintaining the library will become less of a daily thing for most of us.  There’s definitely still bugs to work on and if anyone out there is interested in helping out, just go to this link: here.  Sign up and take a bug to fix!

In the meantime, I’m continuing my work (that I’ve previously stalled) on XB Pointstream.  I’ll initially be working on a reader that converts a proprietary file format to something that’s more usable in the open web (and for our library).  This will probably take me a couple of weeks to get done.  After that, I’ll be working on the many bugs we have filed plus some that are still processing in our heads.  This is definitely going to be a fun semester!

0.9.7 Contribution

Well, I was kind of distraught in my last few posts.  I didn’t know what I was doing differently from some of the things other people were doing.  The code was almost exactly the same (minus obviously different variable names).  I found out later, after taking apart Processing.js and reducing it to less than 4000 lines (it’s currently sitting at 11000+ lines), that the problem was not the way I coded the 3D texture.  The problem was the way we were redrawing 3D objects without a call to the background function.  Or at least, if we didn’t call background in the redraw loop.  I ended up changing my examples to working ones by adding background to the redraw loop.

After I did that, I made sure to make a ticket to fix the background redraw problemAndor said he’d fix it, so I assigned it to him.  It made it to the repository easily enough as the fix was one line but I’ve yet to test it with my work.  I have been working on other things to make it for the 0.9.7 release.  Hopefully, I can test out the examples soon though.

The other function I was working on was textMode.  One particular function of textMode, the default, was already implemented.  The other use of the function was something that I didn’t fully understand and needed the use of the beginRaw function that we will not put in until later.  This textMode function was the reason I was looking at createGraphics again.  The functionality I was working on was the textMode(SCREEN) parameter.  This is basically a heads-up display (HUD).  It writes the text you want on screen and removes / disallows any transformation changes affecting objects in the scene.  So, it becomes written to the screen and unchangeable through transformation like a heads-up display in video games.

To get this working, I used another Processing instance (which is what createGraphics was for) and rendered the text there.  I, then, textured that Processing instance/canvas onto a quad according to the coordinates given.  I made sure that the quad wasn’t affected by transformation calls through pushMatrix and popMatrix functions.  I did find a problem when using a white fill on a transparent background and filed a ticket for it.

Still lost (createGraphics)

Well, it looks like I’m still on my own for now.  I’m still currently in the dark on reasons as to why it’s not working.  My last post indicated most of the code and test cases I’ve done.  I haven’t changed the code very much but I have improved on more specific test cases to try to get to the root of the cause.  Much to my dismay, however, the new cases haven’t revealed much.

Since my test cases before proved that this worked without Processing.js, the next logical step would be to incorporate Pjs into the equation and see what happens.  My first test case (picture below) involves implementing Pjs on a canvas and then throwing that canvas as a texture on a 3D WebGL object; in this case it’s a cube/box.

No problems, so far.  My next test case switches roles for the two canvases.  It comprises of Pjs texturing a quad.  The texture comes from a native canvas with no Pjs on it.  Nothing broken, still.  The next test case was given to me by one of my CDOT co-workers, Matt Postill.  This test case entails that both canvases use Pjs.  However, instead of using createGraphics to implement a Processing.js instance through the original Pjs instance, both canvases already have Pjs and we’re connecting them through the texturing of the quad.

This still works.  At this point, I’m running out of ideas and I’m starting to grasp at straws.  I do still have an idea, though.  My theory, since the quad texture is picking up the supposed first frame of the second canvas, is that the texture is only seeing the original canvas state and not seeing any updates to the canvas through Pjs (this is actually a stupid theory in hindsight considering Pjs does all it’s drawing and filling through canvas functions).  I test this by drawing and filling a square in the sketch through the native canvas functions.  This is broken but I was hoping it would work in this instance.  And I’m still at the point I was at since my last post… lost.  My next step will probably be to strip Pjs of unnecessary components and try to see if it’s anything in Pjs that’s preventing the redraw of the little canvas in the big canvas.

Looking for help… (more createGraphics stuff)

I’m at a block here…

When I last talked about createGraphics, I said I had it working with 3D.  This was partly true.  I had an oversight and assumed all was done.  3D was working as long as the initial context for the sketch was 2D.  I figured this out last week as I was trying to use createGraphics for textMode.  My naïvety made me think this would just work while the context was originally 3D.  Of course, it didn’t.  Trying to render 2D or 3D on an original 3D context didn’t work.  That’s because we didn’t handle it.  Now, I’m trying to fix that to implement textMode.

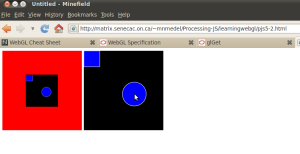
Since I couldn’t get it to work, I started by stripping Processing.js from my test case.  I went with Learning WebGL lesson 5.  This was my initial test case and my objective at the beginning was to use another canvas as the texture.  That was simple enough to get working and the example of that can be seen below.

So after I got that working, I did a double objective test.  The first objective was to get the test working with a dynamically created canvas (like I did before).  The second objective was to try and make it interactive (kind of).  The interactivity, well isn’t really interactive.  I just basically got the background of the canvas to change colours.  I, also, compared code to another example much like the one I’m trying to create.  Anyway, here’s my example:

This seemed to work okay as well, so my next task is putting it in Pjs.  This is the portion I need advice/direction on.  I applied all my knowledge of the existing subject and am still having trouble.  The test case is a little different as I’m rendering a quad instead of a box and the actual object is more interactive than just the background of the canvas changing colours.  However, it should still work and for some reason the image inside isn’t refreshing.  Here’s the test case online:

Mouse over the middle of the left canvas

Now that I’ve given you background on what my objective is, I’ll start talking about the code.  First, we’ll begin with the Pjs sketch.  I’ve stripped out and commented the unnecessary code.  That’s why the background for the bigger canvas is defaulted to grey.  So, the only really working factor is the quad is getting drawn and it’s using the smaller canvas as it’s origin.  The important part of the sketch is the image() function… it’s the point where the smaller canvas is being rendered onto the quad.

I took the important part of the image function out and put it in this pastebin.  This is the part that applies to this subject.  Basically, it takes all the information from the p.texture and p.vertex calls and renders the quad at p.endShape.  p.texture is where the texture is binded to the quad.  Here’s the important part.  Now, the binding for this almost exactly the same as my Learning WebGL example above.  However, I’m still getting problems with the redraw/re-render.  So, it could be within the endShape that I’m getting problems.  The section that renders the quad is called fill3D.  That’s where the points and values get passed onto the program object which uses our shaders.  Now, if you’re wondering about the shaders… here they are.  Could anyone out there guide me on where I’m going wrong?  I am stumped.

XB PointStream 0.4 Release!

So, I haven’t really talked about my new project a whole lot and now I’m going to change that. This is somewhat a pre-emptive release blog as the release isn’t really finalized and probably won’t be until early next week. I just really didn’t know what to name my blog.  I, also, apologize in advanced as this blog will not be very visual… but feel free to click on the links and I’ve also got a sample demo of the PSI file reader below.

Anyway, XB PointStream is on a good course and we’ve got some functionality working with it so far.  Andor Salga will be implementing items like streaming asc files and webgl arrays for this upcoming release.  As for myself, I’ve been working on PSI files and reading them for the past few releases.  I’ve included the framework for reading PSI files and the XML tags used for said files.  It reads the binary in the file and puts it in a variable for now.  I’ve got a sample demo of it in action (note: due to the size of the file, it does take several seconds… the “test” word will turn into ascii binary).

So I’ve implemented the framework, but the actual conversion of the binary will take a little while longer to implement.  Mainly, it’s due to the fact that I still have to decipher the reader they gave me and make better sense of it to finally convert it.  It’s probably going to take a few more releases before I get a finalized working version.  There’s also still plenty to do in the meantime though.  Like with the current release, I’ve also implemented a few easy functions.  One was a simple default function that sets some of the variables back to their default values.  The other was taking sephr‘s tinylog lite logger from Pjs and put it into XBPS, so that we have a simple logging mechanism.  This will probably be changed later to our own custom one, once we have time to implement it.

I’m going to leave you with a bunch of links relating to the project:

Wiki Page – clickity
Github Repo – clickity
Ticket System – clickity
Twitter – clickity
Blogs – clickity

Key stress

For the last week and a half, I’ve been working on making Processing.js (Pjs) keys and keystrokes work more like its Processing (p5) counterpart.  Actually, it was originally already set for review but the reviewers didn’t wish to implement browser detection.  So, I’ve been focusing on feature detection for keys within Pjs.  Now this fix doesn’t seem very hard, only if the browser vendors actually standardized their key presses and key strokes.  Instead, they like to use the method of “ours is better, so do it our way”, which isn’t very helpful to the developers.  I’ll explain my situation and why I’m so stressed and frustrated about this particular fix.

Key codes are not a particular problem within this situation.  Most of the keys/code values are either similar or there’s already existing code to account for different codes.  Not something I’m worried about in terms of Pjs.  Key strokes and repeating is the bigger hassle in this.  There’s also the fact that some browsers use charCode instead of keyCode or vice versa.  Those two combinations by themselves can create a huge mess.  I’m just glad the actual codes aren’t completely different as well, or this would be an even bigger headache.

I’ll start off by saying that there’s three different type of key press events. First is keydown, when you push down a key. Then it’s counterpart is keyup, when you release a key. The last is keypress, which determines if a key is being held down. Coded keys are keys in the keyboard that can alter the given keycode when a key is pressed. The five main keys are Ctrl, Alt, Shift, Caps Lock and Num Lock. Char keys are essentially anything that can produce a character. The movement keys allow movement through the document and then there’s the F keys.

Difference in Key Strokes and Key Uses
Processing Firefox Chrome
char keys refires all events when key is being held down char keys refires keypress event when key is being held down char keys refires keypress and keydown event when key is being held down
coded keys do not get refired when being held down, keypress value does not exist coded keys do not get refired when being held down, keypress value does not exist coded keys do not get refired when being held down, keypress value does not exist
movement and f keys refire keydown and keyup events when held down, keypress value does not exist movement and f keys refire the keypress event when held down movement and fkeys refire the keydown event when held down, keypress value does not exist
All platforms deploy keydown event when a key is pressed and keyup event when a key is released.

They may seem like minor differences but setting them from two differing places to one uniform place creates a lot of problems.  When I was correcting small bugs that came up, another one would pop up and it just kept going until I lost track of what fixes I did for certain bugs.  I’d end up having to restart from a clean slate to begin the comprehension again.  Anyway, I know people are looking to get this working properly as I’m getting hits on my blog about keys in Pjs.  I’ll make sure it gets in before 1.0!

Toronto WebGL Community

Left to Right: myself, Benoit, Andor and Matt

This is the Toronto WebGL Community!  Or at least the people we know that currently actively work on it…  if there’s more of you out there, feel free to let yourself known and get involved by posting on the comments of this blog.  I’ll make sure the right people see your stuff.

Anyway, this picture was taken at the Mozilla Toronto Offices.  Yesterday, I spent the afternoon with some of my co-workers talking to Benoit Jacob about the WebGL implementation within Minefield.  We were doing some profiling and giving feedback on what changes could be made to provide better support for those using the WebGL API through Firefox/Minefield.  So if any of you have suggestions, specifically more about how it’s implemented in Minefield and less about the actual WebGL standard, feel free to leave a comment below and I’ll do my best to get the idea to them.

I, also, learned a couple of neat tricks.  One such is a built in profiler in Linux that I could use on my desktop at work.  It will make bottlenecks a lot easier to find.  The command is perf record, which actually only came out to Ubuntu on a recent release.

We discussed other performance boosters, like TypedArrays.  This is a new proposal to the Javascript language and will be somewhat monumental considering JS is a type-less language.  This introduction will help improve WebGL code and will pave the way for the final release of WebGL.  It just has to be approved by the standards committee.

***NEW*** Toronto WebGL Mailing List (created by Benoit) – clickity